Monday, April 18, 2011

KJ6KUV-11 flight and successful recovery!

KJ6KUV-11 was launched yesterday from Ojai, California at 0820 PDT and successfully recovered 84 minutes later near Oak Park, 53.6 Km to the south-east! Check Kyle's blog for details, but I think all the efforts can be summarized with one single picture:

Earth

During the whole flight, the balloon was able to steadily report its position via APRS and the trajectory could be followed at aprs.fi. Between 12-16 Km altitude, the balloon caught the jet stream and sped up quite a lot as you can tell by the more spread-out points on the map!

kj6kuv-11 trajectory

The tracker was a Trackuino board with a Venus 634FLPx GPS and a Radiometrix HX1 300 mW radio transmitter. We were not sure the HX1 was going to deliver enough power to reach any digipeater from that high up. Well, sure it did... At its peak altitude (20 Km), the signal could be heard from Phoenix, Arizona, which is... 597 Km away!

kj6kuv-11 hx1 range

We were also not sure the Venus 634FLPx would report its position above 18 Km high, since many manufacturers seem to get the CoCom limits all wrong. But then again, the above picture proves how the GPS worked perfectly at 20036 meters.

Here are some flight stats I gathered with WBALTRAK. This is a plot of altitude versus time:

kj6kuv-11 altitude vs time

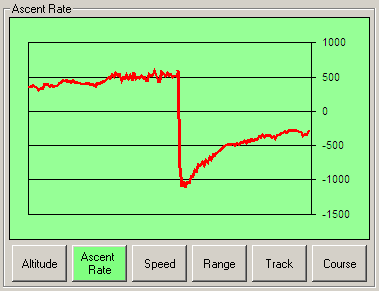
The ascent rate was smooth and constant at about 500 meters/minute. After the balloon popped, the payload fell at a vertiginous 1000 meters/min and steadily slowed down as the air density allowed the parachute to deploy. The payload landed smoothly at 294 meters/min:

kj6kuv-11 vertical rates

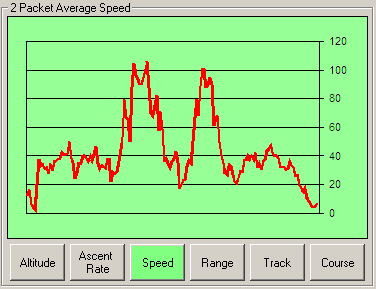
The speed was about 38 Km/h average and it reached peaks of 100 Km/h (about 60 mph) while the balloon was caught by the jet stream:

kj6kuv-11 speed

This was a lot of fun to track :)


Saturday, April 9, 2011

First Flight

I'm really excited to announce that Kyle (KJ6KUV), a great contributor to this project, is launching a balloon and he'll be using a Trackuino board to track its payload. He'll be launching from the Oxnard airport (California) on sunday april 17 around 8:00 am pacific time.

To track the balloon online go to this page. It will have the most recent position as well as the previous positions reported: http://aprs.fi/?call=KJ6KUV-11

Best of luck with the chase!

4 things

A few random updates:

1. I'll be giving a speed talk on Trackuino, high altitude balloons and near space photography at OSHWCON 2011! Quoting their web site:

The Open Source Hardware, Electronics and Robotics Convention is a 3-day event organized by the Synusia collective in an effort to extend the Open Source Software and to promote electronics and the philosophy of "do it yourself". The event will take place in Madrid at the Centro de Formación Padre Piquer,  from the 23 to 25 September 2011.

2. This blog is becoming a bit chaotic, with bits of information here and there. So, I'm giving the Trackuino project's site a facelift. From now on, technical articles will go to the wiki, while news and event updates will stay in this blog.

3. Even though the wiki is pretty much empty right now, I just posted an article on flight prediction based on Rick von Glahn (NØKKZ) great WBALTRAK software. Unlike on-line prediction sites, this program uses actual inflight data to predict the touchdown point with higher accuracy. Check it out, I think flight prediction is a key step prior to and during the flight of high altitude balloons!

4. Last, but not least, we're having our first Trackuino flight next sunday! But this deserves a dedicated post, so stay tuned!


Saturday, January 8, 2011

How to build your own Trackuino board

Update: the latest information on building the Trackuino board (with slight variations from the process described here) is on the google code project's main page.

Here is how to build your own DYI tracker solution based on the Trackuino firmware and Kyle's PCB. Building the tracker involves a bit of hackery at some points, but I'll try to make it as straight-forward as possible. This is how the finished board looks like:

trackuino_board_640.jpg

Features:

This is a summary of older posts, in case you just landed:

  • GPS: Venus 634FLPx. Supports > 18 Km according to their tech support (to be confirmed empirically)
  • Radio: The board supports Radiometrix's HX1 (300 mW) as well as Argentdata's MX146-8v (500 mw).
  • 1200 bauds AFSK using 8-bit PWM
  • Sends out standard APRS position messages (latitude, longitude, altitude, course, speed and time).
  • Internal/external temperature sensors (LM60) to read temperature in and outside the payload
  • Support for 1 capacitive humidity sensor
  • Cut-down "aka suicide" mechanism: you can hook up a nicrom wire and cut the payload line if your balloon gets stuck aloft for a long time.
  • ICSP header for in-circuit programming
  • 2 x SMA female plugs (1 x GPS in + 1 x radio out)
  • Open source (GPLv2 license), both software and hardware. In other words, do whatever you want with it: modify it, add it to your project, etc. as long as you opensource your modifications as well.

Which radio to pick?

hx1_or_mx146.jpg

Radiometrix's HX1 is cheaper, but Argentdata's MX146-8V is more powerful and thus has a better range. On the other hand, the HX1 version requires fewer components to buy and solder. My take? The HX1 is good enough.

How to build the board?

Both Eagle's schematic and PCB source files are here. You can do the exposure/development/etching process yourself, but I suggest sending it to a PCB house. I made the project public at BatchPCB, so anyone can go and order one. Their prices are not bad, but please comment if you find a better deal.

Components

Here is the bill of materials for the HX1 version and the MX146 version. See what I mean about the HX1 requiring fewer components? Also, these parts are in the schematic, but haven't found a clear purpose for them yet, so don't buy them.

How to build the firmware?

The easiest way is with the Arduino IDE. Download the latest "trackuino-ide-xxxxxxxx.zip" from here. Unzip it in your sketches directory.

Now, you'll have to change some settings. Open the "config.h" tab and:

  • Put your own callsign and SSID here. By default it's nonsense, something like "MYCALL". SSID 11 is good for balloons.
  • Select your type of radio here (HX1 or MX146)
  • Optionally, add some custom comment to the APRS messages, set a different TXDELAY, change the APRS update period (default = 61 seconds), etc.

Now open the trackuino.pde sketch, compile and flash.

If you're comfortable with command line tools, there is also a "trackuino-gcc-xxxxxxxx.tgz" version with Makefiles that you can compile with the gcc-avr toolchain. I like to develop using the gcc-avr toolchain because the IDE doesn't support multi-file projects quite well.

Testing!

Time to test the board! Plug the GPS and TX antennas and power the board. You need at least 6 volts for the HX1 version, and 9 volts for the MX146 version.

I have tested the HX1 version. If someone tries with the MX146, feedback will be very welcome!

And since a picture is worth a thousand words, take a look at this screenshot from APRS.FI and see how far this little HX1 can get. I'm successfully being digipeated by EA5ERC-15, which is an unbelievable 144.5 kilometers away! And I'm at sea level!

Captura de pantalla 2011-01-08 a las 20.29.54.png


Thoughts on on-line collaboration

On my last entry, I blogged about a schematic diagram to help those DIYers build their own tracker using the Trackuino firmware. Well, Kyle Crockett picked it up and generously built a nice PCB out of it. It blows me away how we're alive during the time when you can post the most vertical stuff on-line, reach out to those with the same interests as you, and find people across the globe willing to collaborate towards the same goal without ever having met in person... It really does.

IMAG0027.jpg

I'll be posting soon with details on how to get one of these boards manufactured and the bill of materials so that you can assemble it yourself.

Thursday, October 14, 2010

Schematic (II)

Hello! This is a second iteration over my previous schematic.

There are some additions:

Click on the picture to enlarge it, or just download the EAGLE .sch and libraries from my repository.

Friday, July 2, 2010

Using two balloons for controlled descent instead of a parachute?

It has always come to mind that using 2 balloons would provide a slow and controlled descent of the payload. Parachutes won't open at high altitudes because the atmosphere is too thin. So usually, after the balloon pops, the payload starts plummeting and spinning like crazy until it reaches an altitude where the pressure allows the parachute to open. During its crazy nose-dive, the payload, the load line and the parachute itself are very likely become an entangled mess with the whole thing hitting the ground at free-fall speed. Plus I fear the antenna will break as well.

How to prevent this?

Well, Kyle has reported his experience using 3 balloons. The theory is that when 2 of them pop, the 3rd one doesn't have enough lift and starts going down smoothly. I'm really looking forward to him elaborating more on his blog.

Also check out Todd's write up. He used a parachute and a ring to prevent the parachute lines from tangling during descent.